
On the previous article we already told you about the standard sizes bicycles shared continuously through the ages. One of them is about the drivetrain, which are the components that transfers the power from your leg into the rear wheel, further propels the bicycle forward. Replacing the old drivetrain on your bicycle with the latest technology can make a lot difference, while maintaining the same handling characteristic that's been familiar to you for ages.
Among those drivetrain components are crankset (the crank arm plus the chainring(s)), bottom bracket, chain, cog (you call them cassette on multi-speed bicycles, for they are more than one installed), and derailers. Let's talk about crankset and bottom bracket first.
 |
| A 2006 Shimano Deore XT FC-M760 integrated crankset installed on a 1994 Federal City Cat SS frame. |
Things to concern regarding installation of crankset and bottom bracket on your bicycle are the bottom bracket shell size on the frame, bottom bracket/crankset type, and bottom bracket spindle length.
1. Bottom Bracket Shell Size
Crankset spun around bearing assembly that's called bottom bracket, and the bottom bracket is installed on the frame in the bottom bracket shell which is located on the downside of the frame, where the seattube, downtube, and chainstays meet.
 |
| Bottom bracket shell on a typical bicycle frame. |
Should you ever wanted to replace your worn-out bottom bracket bearing or even upgrade it with a newer system, you should first measure the size of the bottom bracket shell to make sure you have the correct bottom bracket that matches your frame. Bottom brackets plays an important role to the overall feel of the bicycle, mainly on the drivetrain. Following are the bottom bracket size that commonly found on majority of bicycles.
1.1. English Thread
The English thread is the sizing commonly found on most population of bicycles around the world. They usually come in 68mm width, especially on road bikes and earlier mountain bikes. Newer mountain bikes used 73mm width bottom bracket shell, and some downhill bikes even used the 83mm width bottom bracket shell to improve rigidity and better chainline, especially on the bikes that used 150mm wide rear hubs.
The English thread have different threading direction. On the left side, you have to turn the bottom bracket cup clockwise to tighten them, while on the right side you have to turn the cup counterclockwise to tighten. Make sure that you're turning those cups on the right direction, or you'll ended up in confusion or worse, ruined bottom bracket shell.
 |
| English/British/ISO thread bottom bracket shell. The thread size is 1,37 x 24 tpi. Roughly the inner diameter of English bottom bracket shell is around 34mm as pictured. |
 |
| Common 68mm wide English bottom bracket shell. |
1.2. Italian Thread
The Italian thread is the sizing that found on, well, almost every Italian made frames, especially classic track and road frames. Althought some Italian manufacturer switched to English standards lately, but having an Italian shell can give you a bragging right that your frame is made in Italy. They come only in one width size, 70mm.
The Italian thread have similar threading direction, they both are tighten clockwise on the either side of the cup.
 |
| Italian bottom bracket shell. The thread size is 36 x 24 tpi. Roughly the inner diameter of Italian bottom bracket shell is 36mm as pictured. |
 |
| 70mm wide Italian bottom bracket shell. |
If you're unsure about your bottom bracket size, the easiest way is to check out the old bottom bracket that already installed on your frame. Sometimes they have their sizing written on them. But if your frame doesn't came with a bottom bracket, just measure the width with a ruler.
There are also many other standards used, but they are not so commonly found. Sheldon Brown had a nice summary about the bottom bracket shell sizing here.
2. Bottom Bracket/Crankset Type
They are many kinds of interfaces that are used on the connection between the bottom bracket spindle and the crank arm. The standards commonly found are square taper spindle (ISO/JIS) and splined spindle such as Shimano's Octalink standard and ISIS (International Splined Interface Standard). The latest generation of cranksets integrates the spindle into the crank arm, this is called the integrated bottom bracket system.
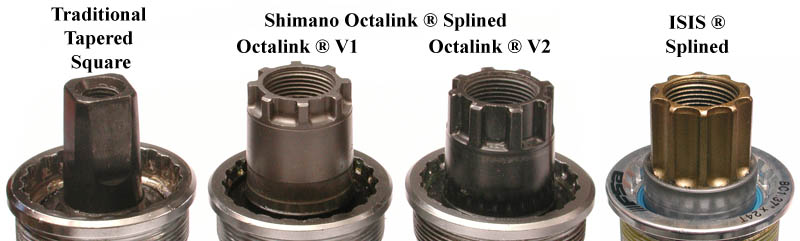 |
| Bottom bracket spindle interfaces. These are found on both ends of the bottom bracket spindle. (Source) |
2.1. Square-Taper Bottom Bracket
Square taper bottom brackets are commonly found, followed by ISIS and Octalink. Especially if your bike was bought new at the early nineties or prior to that. Square taper bottom brackets are also popular on singlespeed bikes because they're reasonably priced, easy to service, and durable.
The square taper bottom bracket comes in two bearing assembly options, the traditional and adjustable cup-and-cone bearing (as used in classic and NJS track cranksets) and the modern, easy to install, yet unadjustable cartridge bearing (commonly found nowadays). Apart from the differences that lies on the bearing type, adjustability and the installation method, they are interchangeable. Upgrading from cup-and-cone bottom bracket to cartridge bearing bottom bracket is advised, especially if you ride your bike often and in awful weather.
 |
| Shimano cartridge bottom bracket (top) and Campagnolo cup-and-cone bottom bracket (bottom), pictured as assembled inside the bottom bracket shell. |
 |
| Exploded view. The left cup on cartridge bottom bracket (the black cup on the Shimano unit pictured here) acts as a locking mechanism to prevent the bottom bracket assembly to unscrew loose, they're not adjustable. The white accordion-like plastic sleeve on the cup-and-cone bottom bracket keeps the bearing away from grime and dirt. Note the adjustable left cup and the lockring on the Campagnolo unit, also the logo engraving on the stainless steel spindle. |
The only weak point on the square taper bottom bracket is that the small diameter spindle is prone to flexing or bending, although you have to be an athlete with power output being more than the wattages on the lighthouse lamps or landed a serious drop-to-flat to really feel the flex or bend the spindle. Which bring us to the splined spindle standard, Octalink and ISIS.
2.2. Splined Bottom Bracket
Octalink, designed by Shimano, was the first successful alternative to the older square taper. The Octalink system uses a larger and stiffer spindle with eight splines, hence the name. The splines provide a greater contact area between crank and spindle for a stiffer interface. Octalink exists in the marketplace in two variants, Octalink V1 (which is used on XTR, 105, Ultegra 6500 and Dura Ace 7700 cranksets) and Octalink V2 (used on later mountain bike crankset designs). The system is proprietary and protected by Shimano patents and licence fees, thus relatively few companies aside from Shimano produce Octalink cranksets. While some competitors to Shimano (especially Campagnolo) continued to use the older square taper, others worked together to create a similar ISIS design as a free alternative.
ISIS Drive, which stands for International Splined Interface Standard, is an open standard splined specification for the interface between a bicycle crankset and the bottom bracket spindle. It was created by King Cycle Group, Truvativ, and Race Face in response to the proprietary Shimano Octalink splined bottom bracket standard. As the standards are separate, an Octalink-standard bottom bracket (8 spline) cannot connect to an ISIS crankset (10 spline) and vice versa. One shortcoming in the design of the ISIS bottom bracket is the decreased bearing life compared to square taper bottom brackets. This is because it uses a larger diameter spindle in the same sized shell, so the bearings are smaller.
Although Octalink proved to be a successful and reliable 3-piece system, Shimano's newer 2-piece systems have integrated the spindle onto the right crank arm. In the meantime, the shortcoming found on the ISIS system led to the development of external bearing designs.
2.3. External Bearing/Integrated Bottom Bracket
 |
| Shimano integrated bottom bracket cranksets. The spindle is integrated to the right/drive side crank arm. |
Integrated bottom bracket system, sometimes referred as 2-piece crankset, Mega Exo, Giga X-Pipe, outboard/external bottom bracket and the likes (remember, some people called this kind of bottom brackets as "Hollowtech II", after Shimano's patent name. Actually that name refers to the hollow crank arms that also used on mid to top level Octalink cranksets, not the bottom bracket. It just happens that earlier Shimano integrated cranksets used hollow crank arm, so that's where this misinterpretation came from) uses an external bearing assembly outside the bottom bracket shell, so that the spindle can be increased in diameter while being able to use larger bearings to ensure better load distribution.
No matter the system, whether is it square taper, splined, or outboard bottom bracket, they're available in English and Italian threading. Make sure you choose the threading that suits your frame.
3. Bottom Bracket Spindle Length
You only have to consider spindle length if you're using square taper and splined bottom bracket. With the integrated bottom bracket, the spindle length wouldn't be an issue since the they are integrated to the crank arm.
Spindle length are available in different length to match the crankset, further to achieve best chainline on your bicycle. Every different crankset needed specific length, and this may lead to confusion. Have a quick stroll to Sheldon Brown's spindle length database, here.
Longer or shorter spindle length may be needed to suit your crankset regarding the chainline. Just check out the chainline on your bike, which Sheldon Brown have described better here. Sometimes longer spindle length is needed because your chainring just sits too close to the chainstay so you have to move them outwards to avoid the chainring to grind the chainstays. The chainline might be compromised, but according to our experience, 2mm tolerance on the chainline is acceptable on multispeed drivetrain system.
Sounds intriguing? No. Actually it's very simple. First, decide what crankset to go on your resurrection project, whether it is a single, double, or even triple chainring crankset that suits your need or your build concept. If you're using square taper or splined bottom bracket interface, the next step is to determine the spindle length that suits your crankset and frame (look for a perfect chainline while maintaining enough clearance between the chainring and the chainstay). Lastly, make sure the new bottom bracket cup threadings matches the bottom bracket shell on your frame.
Nice article to know the bottom of the bike..thanks!
ReplyDeleteGreat article! Even for dummies like me that are still learning this stuff!
ReplyDeleteThank you very much for keeping this available. Please leave up so others can learn as well or I can refer back to when I've lost my memory in a few months!
;-)